Error: creating Auto Scaling Group : ValidationError: You must use a valid fully-formed launch template. Value () for parameter groupId is invalid. The value cannot be empty

As a DevOps engineer, we do encounter such cryptic error messages while launching infrastructures. In the below post, we will try to understand one such error while creating an Auto Scaling Group in AWS cloud, with a possible workaround.

Error:
Error: creating Auto Scaling Group : ValidationError: You must use a valid fully-formed launch template. Value () for parameter groupId is invalid. The value cannot be empty
│ status code: 400, request id: aac314dd-082f-4634-82ca-8bd6

Backgroud

We are trying to create an Auto Scaling group with a launch template.

# Auto Scale Group
resource "aws_autoscaling_group" "osc_asg_application" {
  name                = "osc-asg-application"
  max_size            = 1
  min_size            = 1
  desired_capacity    = 1
  vpc_zone_identifier = [aws_subnet.osc_application.id]
  launch_template {
    id      = aws_launch_template.osc_application_launch_template.id
    version = "$Latest"
  }
  tag {
    key                 = "name"
    value               = "osc-asg-application"
    propagate_at_launch = true
  }
}
# Launch Template
resource "aws_launch_template" "osc_application_launch_template" {
  name                   = "osc-application-launch-template"
  image_id               = data.aws_ami.cloudfront_ami.image_id
  key_name               = "demokey"
  instance_type          = "t2.micro"
  security_group_names = [aws_security_group.osc_security_group.id]
  block_device_mappings {
    device_name = "/dev/sdf"
    ebs {
      volume_size = 8
      volume_type = "gp3"

    }
  }

  dynamic "tag_specifications" {
    for_each = var.tag_resource
    content {
      resource_type = tag_specifications.value
      tags = {
        Name = "osc-application-resource"
      }
    }
  }

  tags = {
    Name = "osc-application-launch-template"
  }
}

When we planned and applied the above terraform code, it failed with the following error code.


Error: creating Auto Scaling Group : ValidationError: You must use a valid fully-formed launch template. Value () for parameter groupId is invalid. The value cannot be empty
│ status code: 400, request id: aac314dd-082f-4634-82ca-8bd6b9fe69a6

Upon investigating the issue futher, we found the security group argument passed in launch template was wrong. We had passed the argument security_group_names instead of vpc_security_group_ids.

We made the changes in the launch template and updated the security group argument.

The updated working launch template code is as below,

resource "aws_launch_template" "osc_application_launch_template" {
  name                 = "osc-application-launch-template"
  image_id             = data.aws_ami.cloudfront_ami.image_id
  key_name             = "demokey"
  instance_type        = "t2.micro"
  vpc_security_group_ids = [aws_security_group.osc_security_group.id]
  block_device_mappings {
    device_name = "/dev/sdf"
    ebs {
      volume_size = 8
      volume_type = "gp3"

    }
  }

  dynamic "tag_specifications" {
    for_each = var.tag_resource
    content {
      resource_type = tag_specifications.value
      tags = {
        Name = "osc-application-resource"
      }
    }
  }

  tags = {
    Name = "osc-application-launch-template"
  }
}

Terraform: error configuring S3 Backend: no valid credential sources for S3 Backend found.

Terraform backend configuration for remote storage may be quite challenging if the correct parameters are not passed.

We can get multiple errors while executing the terraform init command, depending upon the configuration arguments we miss or based upon the permissions defined for our AWS profile or AWS User/Role.

Terraform Backend State Configuration

Terraform Backend Configuration Document

Here, we will focus on valid credential errors.

Error: Error configuring S3 Backend: no valid credential sources for S3 Backend found.

Terraform backend configuration code: The backend was defined as below, we specified the bucket, key, and region.

terraform {
  required_providers {
    aws = {
        source = "hashicorp/aws"
    }
  }
  backend "s3" {
    bucket = "terraform-backend"
    key = "misc-infra-terraform-state"
    region = "us-east-1"
  }
}

When we ran the terraform init command for the above configuration and got the below error,

terraform s3 backend error


E:\terraform>terraform init

Initializing the backend...
â•·
│ Error: error configuring S3 Backend: no valid credential sources for S3 Backend found.
│
│ Please see https://www.terraform.io/docs/language/settings/backends/s3.html
│ for more information about providing credentials.
│
│ Error: NoCredentialProviders: no valid providers in chain. Deprecated.
│       For verbose messaging see aws.Config.CredentialsChainVerboseErrors

In our case, the fix was pretty easy, the above terraform backend block had missing AWS credentials, we just passed the credential details, and it worked like charm!

Updated S3 Backend configuration

terraform {
  required_providers {
    aws = {
        source = "hashicorp/aws"
    }
  }
  backend "s3" {
    bucket = "terraform-backend"
    key = "misc-infra-terraform-state"
    region = "us-east-1"
    profile = "myaws_profile"
  }
}

Terraform – GitHub Repository Creation

Git is one of the official providers supported by Terraform. We can manage GitHub through Terraform, like repository creation, GitHub Actions, etc.

The official terraform git document can be here

In our below example, we will try to create a basic private repository in our GitHub account.

Authentication Method

Terraform supports two types of Authentication for Github.

  • OAuth /Personal Access Token
  • GitHub App Installation

OAuth /Personal Access Token

This is the easiest method for authenticating Git using Terraform. We will need to create a token in our GitHub account and pass the Token value to our Terraform provider block.

Steps to Generate OAuth /Personal Access Token

  • Log in to your GitHub account at, https://github.com
  • Click on the Left Top side profile icon and on the navigation bar, click on setting
terraform GitHub repository setting
  • Now, on the right-hand side profile navigation panel, click on the Developer settings
terraform git repository developer setting
  • On the Developers setting Page, select Personal access tokens, then select Tokens (classic)
  • You can select Fine-grained Tokens, but during this document creation it was a beta version, so we will go with classic tokens.
  • Click on Generate new token and select Classic Tokens.
terraform GitHub repository classic token
  • On the New personal access token (classic) generate the page, and update the following.
    • Note – Your Token usage description.
    • Expiration – Set the date to a minimum, for security purposes.
    • Select Scopes – select the permission/role you want to grant to your token, do not select all roles. select only the minimum roles which are required.
terraform GitHub token creation page
  • Once you update the above details, click on Generate token
  • Copy the generated token, as we will need this token in our terraform code
terraform GitHub token example

Note: The token shown in the above example has been deleted and no longer exist

Terraform Code

Define the provider block using GitHub as the provider, in our example, we have defined in provider.tf file.

terraform {
  required_providers {
    github = {
      source  = "integrations/github"
      version = "~> 5.0"
    }
  }
}

provider "github" {
  token = var.token
}

Now define your variables in variable.tf file.

variable "token" {
  description = "Enter your git token"
  default     = "ghp_xxxxxxxxxxxxxxxxxxxxxxxxxxxrfR1c"
}

Let us define the GitHub repositroy resource block in main.tf file. The output for our configuration will be the HTTP clone URL of our newly created repository

resource "github_repository" "my-terraform-repo" {
  name        = "my-terraform-repo"
  description = "Git repository created using Terraform"
  visibility  = "private"
}

# get the http clone url 
output "get_clone_url" {
  value = github_repository.my-terraform-repo.http_clone_url
}

We have completed the configuration, now let us init our terraform to download the git modules and plugins.

terraform init 
terraform GitHub init

The GitHub plugins/modules are downloaded, and now we will run the plan for an overview of our GitHub repository.

terraform plan -out gitrepo.tfplan
terraform GitHub plan

To create the GitHub repository, we will run the apply command with the above plan file.

terraform apply gitrepo.tfplan
terraform GitHub apply

The terraform has created our repository successfully, we can cross-verify them by validating them in our GitHub.

Terraform – Destroy Command

Terraform destroy command, is a way to destroy the infrastructure created using Terraform.

Often we need to destroy all or specific resources that we are managing using the terraform. terraform destroy is a way we can destroy the managed resource.

Syntax

terraform destroy <options> <resource_id>

To delete all managed resources, we can directly use the command, You will prompt for confirmation prior to destroying the managed resources.

Option 1:

terraform destroy

As we can see in the below output, terraform will list the resources to be destroyed and will prompt for confirmation.

Note: The confirmation should be case sensitive “yes“, any other word or even “Yes/YES” etc will result in cancellation of destruction.

terraform destroy command

Option 2:

To destroy specific resources from your managed resource use the flag –target along with the destroy command.

Syntax

terraform destroy --target <resource_id>

If you are not aware of your <resource_id>, there is an easy way to get the resource id. you will need to run the state list command. The state list command will list all the resources under your state file.

terraform state list

Once you have the resources listed, copy the resource id and use it in your destroy command as the target resource.

terraform destroy --target aws_vpc.siva_terraform_vpc[0]
terraform destroy command -target

If you do not want a user prompt/confirmation for resource deletion, you will need to pass the flag –auto-approve.

Syntax

terraform destroy --auto-approve
terraform destroy command –aoto-approve

As we can see all the resources will get terminated without any user confirmation.

Often we may want to delete all resources, except a few. In such a case, we can use the terraform state rm command to remove the resource from the state file and then run the terraform destroy command.

Syntax

terraform state rm <resource_id>
terraform state rm aws_vpc.siva_terraform_vpc[0]
terraform destroy command state rm

Now, if you run the terraform destroy command, all resources except the one we have removed from the state file will get terminated as terraform will not consider the resource as managed by terraform.

Read further,
Terraform Destroy

Ansible – gather facts (playbook)

Ansible provides valuable information about the nodes (server/system) through ansible gather facts.

Ansible ad-hoc command uses a setup module to get the facts, refer to our earlier post for more detail on the Ansible Ad-Hoc setup module.

Ansible playbook on the other hand by default collects the fact information. This fact information is stored in a variable called ansible_facts.

Example

---
 - name: Ansible Playbook - Get facts 
   hosts: localhost

   tasks: 
   - name: Ansible-playbook will gather facts by default. The facts are stored in ansible_facts variable.
     debug:
      msg:
      - "{{ansible_facts }}"

The above playbook will print all ansible fact information like the setup command, but we do not need all this information, or we need a few details. To fetch the required details we must know the keys.

We can get the keys using two methods,

Run the ansible ad-hoc command

ansible localhost -m setup | grep ansible
ansible gather facts – ad-hoc command

As we can see from the above output, all variables are listed with the prefix ansible. We can directly use these variables in our playbook to fetch the specific fact information.

The second method is to run the setup command and then add an ansible prefix to the dictionary root keys.

ansible gather facts – default facts

As we can see from the ansible fact output we can select the key name and just add the prefix ansible to create the variable.

Example

---
 - name: Ansible Playbook - Get facts 
   hosts: localhost

   tasks: 
   - name: Ansible-playbook will gather facts by default. The facts are stored in ansible_facts variable.
     debug:
      msg:
      - "{{ansible_facts }}"

   - name: get indiviual tasks from the facts. 
     debug:
      msg:
      - "{{ansible_distribution}}"
      - "{{ansible_system}}"
      - "{{ansible_lsb['description']}}"
ansible gather facts – custom output

Ansible – Variables through command line argument

sometimes we do not want to declare a variable value hard-coded in the playbook file instead, we want it to be passed dynamically during execution.

Ansible does support passing variables dynamically through command arguments.

We have covered Ansible Variables, and the Ansible Data Types in our earlier post,

To pass variables through the command line argument, use flag –extra-var or -e.

Syntax

ansible-playbook <playbook_name> -e <var>=<varvalue>

or

ansible-playbook <playbook_name> --extra-var <var>=<varvalue>

We can pass single as well as multiple variables through command arguments.

# Pass variable through the command line argument
---
 - name: Playbook - Variable through command line argument
   hosts: localhost

   tasks:
   - name: Pass single variable through cmd argument
     debug:
      msg:
      - "The Operating System runnings is {{os}}"
      - "The Operating System is {{os}} and base_version : {{version}}"

Example: Single command argument

ansible-playbook ansible_vars_cmd_arg.yml -e os=linux

or

ansible-playbook ansible_vars_cmd_arg.yml -e "{'os' : 'ubuntu'}"

or

ansible-playbook ansible_vars_cmd_arg.yml --extra-var "{'os' : 'ubuntu'}"
ansible single variable command argument

Example: Multiple variable command argument

ansible-playbook ansible_vars_cmd_arg.yml -e "os=Ubuntu version=20.04"

or

ansible-playbook ansible_vars_cmd_arg.yml -e "{'os':'ubuntu', 'version':'20.04'}"

or

ansible-playbook ansible_vars_cmd_arg.yml --extra-var "{'os':'ubuntu', 'version':'20.04'}"
ansible multiple variable command argument

We can also pass complex data types List and Maps, through command arguments

Example: List variable command argument

ansible-playbook ansible_vars_cmd_arg.yml -e "{'list_var':['Ubuntu','Windows','Mac']}"
ansible list variable command argument

Example: Map variable command argument

ansible-playbook ansible_vars_cmd_arg.yml -e "{'list_var':{'os':'Ubuntu','version':'20.04'}}"
ansible map variable command argument

We can pass variable files through command arguments. More details on declaring file variables.

Example: File variable command argument

# Pass variable through the command line argument
---
 - name: Playbook - Variable through command line argument
   hosts: localhost

   tasks:
   - name: Pass variable file through command argument
     debug:
      msg:
      # map_os is a variable defined in file variable.yml
      - "Passing variable through variable file {{map_os}}"

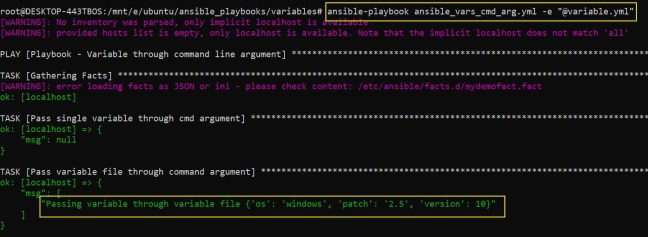
Syntax

ansible-playbook <playbook-file> -e "@<variable_file.yml>"
or
ansible-playbook <playbook-file> --extra-var "@<variable_file.yml>"

Example

ansible-playbook ansible_vars_cmd_arg.yml -e "@variable.yml"
ansible file variable command argument

Summary: Ansible does provide us with various methods to pass variables dynamically. Dynamic variable passing through command argument allows reusing the code.

For a real-time example, let us consider that we want to install/un-install multiple packages on our system/servers. In normal circumstances, we would go writing tasks for each package.

To avoid writing tasks for each package, we can pass the package name as variables dynamically and the same piece of configuration code can be used for installing multiple packages by just passing the package name through the command arguments.

More details on Ansible Variables can be found on Ansible Official Documents

Ansible – Variable file

Ansible does support passing the variables through files. The variable files can be created in JSON and YAML format.

We have covered Ansible Variables, and the Ansible Data Types in our earlier post,

Example of Ansible YAML variable file,

# variables in yaml
---
 number: 10
 str_ex: "john"
 lists_ex:
 - "new york"
 - "london"
 - "sydney"
 - "mumbai"
 map_ex: 
 - "name": "john"
 - "address": "Chicago"
 - "country": "US"
 map_ex_2: {"os": "windows", "patch": "2.5", "version": 10}

Example of Ansible JSON variable file,

{
    "number": 6,
    "name": "Mike",
    "list": [1, "apple", 5, "fruit"],
    "map": {"os": "Ubuntu", "patch": "2.5", "version": 18.10}
}

Ansible playbook supports both single variable files as well multiple variable files.

Ansible playbook with single variable file,

---
# ansible play for variable through file
 - name: Ansible supports variables from json and yaml files
   hosts: localhost
   vars_files: variable.yml
   
   tasks:
   - name: Lets print vales from single variable file
     debug:
      msg:
      - "Printing value form variable file {{map_ex_2}}"
      - "printing the secong map example {{map_ex}}"
ansible-playbook variable single file

Ansible playbook with multiple variable files,

 # Ansible play to read variable through multiple files
 - name: ansible playbook from multiple files
   hosts: localhost
   vars_files:
   - variable.yml
   - variable.json

   tasks:
   - name: Lets print the variables from two different files
     debug:
      msg:
      - "Reading variable through json {{map}}"
      - "Reading variable through YAML {{map_ex_2}}"
ansible-playbook variable multiple files

Summary:

Ansible variable files help in organizing variables in a single YAML/JSON file. That allows ease in the modification of the variables.

We don’t need to define the variables in each playbook. Instead, the variables can be defined in a file and called in all playbooks as per the requirements.

More details on Ansible Variables can be found on Ansible Official Documents

Ansible – register variable

Often we require to store the result of our command outputs in any variables, so we can use them further as inputs or just display them on our output screen.

Ansible does offer us to store or print the output results, this can be done using the Ansible register variable.

We have covered Ansible Variables, and the Ansible Data Types in our earlier post,

Syntax:

---
 - name: Lets learn Ansible registry
   hosts: localhost

   tasks:
   - name: lets get the bash version
     shell: "bash --version"
     register: bash_version

   - name: lets print the raw output  
     debug:
      msg:
      - "The shell module raw output "
      - "{{bash_version}}"

In the above ansible playbook, we are running the command bash –version. Ansible will run the command but will not display the output.

The register will store the output value of the bash –version command and we can further display the output using the debug module.

Ansible registry

Now let’s play around with the output and get the specific output we want, in our case we need the bash version from the above dictionary/map.

We have covered the Ansible Map data type,

   - name: lets print specific key from output value
     debug:
      msg: # Print array/dictonary/map values 
      - "We can print specific key in three different ways"
      - "Method 1 : Output stdout key from raw output -  " 
      - "{{bash_version.stdout}}"
      - "Method 2 : Output stdout key from raw output -  "
      - "{{bash_version['stdout']}}"
      - "Method 3 : Output stdout key from raw output -  "
      - "{{bash_version.get('stdout')}}"


In our case, the output is in Map/Dictionary format, use the key name to fetch specific values from the Map.

ansible output

Now, let’s split the string using Ansible Split function, as we can see in the below code snippet, we can go on extracting the pattern from the string as per our requirements.

- name: lets split string in the output value 
     debug:
      msg:
      - "Lets Split the output value string - "
      - "{{bash_version.stdout.split('\n')}}"
      - "lets get the first string value - "
      - "{{bash_version.stdout.split('\n')[0]}}"
      - "Now, lets get further stplit it with space - "
      - "{{bash_version.stdout.split('\n')[0].split()}}"
      - "Lets print the version - "
      - "{{bash_version.stdout.split('\n')[0].split()[3]}}"
ansible split string

You can find the full ansible playbook code below,

---
 - name: Lets learn Ansible registry
   hosts: localhost

   tasks:
   - name: lets get the bash version
     shell: "bash --version"
     register: bash_version

   - name: lets print the raw output  
     debug:
      msg:
      - "The shell module raw output "
      - "{{bash_version}}"

   - name: lets print specific key from output value
     debug:
      msg: # Print array/dictonary/map values 
      - "We can print specific key in three different ways"
      - "Method 1 : Output stdout key from raw output -  " 
      - "{{bash_version.stdout}}"
      - "Method 2 : Output stdout key from raw output -  "
      - "{{bash_version['stdout']}}"
      - "Method 3 : Output stdout key from raw output -  "
      - "{{bash_version.get('stdout')}}"

   - name: lets split string in the output value 
     debug:
      msg:
      - "Lets Split the output value string - "
      - "{{bash_version.stdout.split('\n')}}"
      - "lets get the first string value - "
      - "{{bash_version.stdout.split('\n')[0]}}"
      - "Now, lets get further stplit it with space - "
      - "{{bash_version.stdout.split('\n')[0].split()}}"
      - "Lets print the version - "
      - "{{bash_version.stdout.split('\n')[0].split()[3]}}"

Summary

  • Ansible registers can be used to output the module into the variables.
  • These variables can be used further to print the output and used as input variables in the playbook.

Ansible – Data Structure / Collection data type

Ansible support complex data type like data structure or collection types like List, Map, etc.

We have covered Ansible Variables, and the Ansible Data Types in our earlier post,

Ansible Data Structure or Collection types supports,

  • Lists, are a collection of items and are generally represented using the [] brackets. The items in the list are indexed and can be accessed using index values starting from zero.
  • We can define a list in two ways, as shown below.
vars:
    var_list: ['db_server', 'web_server', 'app_server']
    var_list_2:
    - 'db'
    - 'web'
    - 'app'
  • A Map is similar to the python dictionary. In Map, you can have key, and value pairs.
  • We can define Map in two ways as shown below.
vars:
    var_dict: {'db_server':'mysql', 'web_server':'apache', 'app_server':'php'}
    var_dict_2:
     'db': 'mysql'
     'web': 'apache'
     'app': 'php'

Example code of List and Map,

---
 # Ansible Data Structure
 - name: Playbook - Ansible Data Structure 
   hosts: localhost
   vars:
    # Ansible List
    var_list: ['db_server', 'web_server', 'app_server']
    var_list_2:
    - 'db'
    - 'web'
    - 'app'
    # Ansible Map
    var_dict: {'db_server':'mysql', 'web_server':'apache', 'app_server':'php'}
    var_dict_2:
     'db': 'mysql'
     'web': 'apache'
     'app': 'php'

   tasks:
   - name: Lets print the list
     debug: var=var_list
   
   - name: Lets print the dict
     debug: var=var_dict

   - name: lets print the second list
     debug: var=var_list_2

   - name: lets print the second dict
     debug: var=var_dict_2

   - name: Lets print specific list value
     debug:
      msg:
       - "The second value of list is {{var_list[1]}}"
       - "The second value of the dict is {{var_dict_2['web']}}"
       - Another method of calling value from dict {{var_dict.get('app_server')}}
       - lets get all the dict keys {{var_dict.keys()}}
       - lets get all the dict values {{var_dict.values()}}

The below screencap shows the output of the list and map using different methods as defined in the above code.

Ansible – Data Structure

Ansible – variable data type

Ansible variables support various data types, similar to many programming languages.

We have covered the Ansible variables in our earlier post, Ansible Variables

Ansible does offer us a way to check the type of variables used in our playbooks. To check the variables data types in your playbook, use the “type_debug” keyword.

Example:

- name: Playbook - to get the data types
   hosts: localhost
   vars: 
    y: 15
    server_name: "db_server"
    boolean_value: false
    float_value: 10.10

   tasks:
   - name: Lets get the data type
     debug:
      msg:
       - "Variable : {{y}}, is of type {{y | type_debug}}"
       - "Variable : {{server_name}}, is of type {{server_name | type_debug}}"
       - "Variable : {{boolean_value}}, is of type {{boolean_value | type_debug}}"
       - "Variable : {{float_value}}, is of type {{float_value | type_debug}}"

As you can see in the above code, we need to pass pipe operator | and then type_debug.

ansible variable data type