- DynamoDB is fast and flexible NoSQL DB. It can be used for all application that needs consistent, single-digit millisecond latency at any scale. It is fully managed database. And supports both document and key-value data model.
- Stored in SSD storage.
- Spread across three geographically distinct data centers.
- Eventual Consistent Read (Default).
- Consistency across all copies of the data is usually reached within 1 second. Repeating a read after a short time should return an updated data.
- Strongly consistent Read.
- Returns a result that reflects all writes that received successful response prior the read.
- Returns a result that reflects all writes that received successful response prior the read.
- DynamoDB pricing
- Provisioned Throughput capacity.
- Write Throughput $0.0065 per hour for every 10 units.
- Read Throughput $0.0065 per hour for every 50 units.
- Storage cost of $0.25GB per month.
- Provisioned Throughput capacity.
Author: admin
Aurora
- Aurora runs only in AWS infrastructure.
- Aurora is MySQL compatible, and can provide 5-times better performance than MySQL.
- Aurora can deliver High Availability and performance.
- Aurora provides better Scaling.
- Aurora starts with 10GB and can scales in 10GB increments to 64 TB (Storage Auto Scaling)
- Compute resource can upscale to 32v CPUs and 244 GB of Memory.
- Aurora maintains two copies of the data in each AZ and maintains 3 AZ, so total 6 copies of the data.
- Aurora is designed to handle transparently the loss of up to two copies of data without impacting the write availability and up to three copies without impacting the read availability.
- Aurora is a self-healing, Data blocks and disks are continuously scanned for errors and repaired automatically.
- Two types of Replicas for Aurora
- Aurora Replicas (currently 15)
- MySQL read Replicas (Currently 5)
- Replicas priority login works in Tier 0 > Tier 1 > …. > Tier 15.
- DB Cluster Identifier will be the DNS end point for the database instance.
- Replication instance will have the DNS name as end point. In case of failure of the Cluster end point, it will automatically use the replication instance end point, no need to update the connection string.
AWL CLI Paging
- Paging controls the number of output shown on the CLI prompt, when we run the cli commands.
- The default page size is 100
- If you run a command which has 300 object, CL will make three different API calls but the output will show all in same cmd window as a single API. You may need to pass the next token value depending upon the command you run.
- In certain cases if the object exceeds 1000 limit, we may get time out error.
- To fix this error we will use the flag –page-size and provide the number less than the limit.
- Still the CLI will fetch all records but with more number of API calls fetching records in smaller number.
- Use –max-item flag to limit the CLI output
CLI paging commands
As shown below example, we are using paging to fetch the s3 bucket list.
aws s3api list-objects --bucket <YOUR_BUCKET_NAME>aws s3api list-objects --bucket <YOUR_BUCKET_NAME> --page-size 5aws s3api list-objects --bucket <YOUR_BUCKET_NAME> --max-items 1
VPC – ACL (Access Control List)
VPC by default has one ACL (Network) and it allows all inbound and outbound traffic.
You can create a custom network ACL, by default custom network blocks all inbound and outbound traffics, until we add the rules.
Each subnet in VPC is associated with the ACL, if we don’t associate a subnet with network ACL, the subnet will automatically have associated with the default network ACL.
You can associate a network ACL with multiple subnets, however, a subnet can be associated with only one network ACL at a time, when you associate a network ACL with a subnet, the previous association is removed.
a network ACL contains a numbered list of rules that are evaluated in order, starting with the lowest numbered rule.
ACL has separate inbound and outbound rules, each rule can either allow or deny traffic.
Network ACLs are stateless, responses to allowed inbound traffic are subjected to the rules for outbound traffic and vice versa.
Note – Ephemeral rules, as why we cannot browse the application even when we have the inbound and outbound traffic is enabled for port 80/143
The rule works based on hierarchy like 100 will be executed prior to 110. That is just a number preference set for the rule.
Terraform Module
Modules are defined with module blocks. They are used for the reusability of the code, suppose you have a stack that can be re-used. In such a case instead of copy-paste the same resource code, again and again, we define a module.

Any folder containing a configuration file is by default considered as a module in Terraform.
These modules are referenced in the module code block.
Modules do contain input and outputs.
The module looks similar to resources, they just don’t have types. Each module must have unique names, in the configuration. Modules only have one required parameter, i.e. source.
Modules can be stored in local as well as remote locations,
- Github
- Local
- Terraform Registry
- Gitbucket
- HTTP URL
- S3 Bucket
- GCS Bucket
Note – You may need to run the terraform init command to call the module file. In case of any update in the module file, you will need to run terraform init command in order to get those module updates reflected in your terraform configuration, failure to do so will result in the below error.
$ terraform init

Terraform Destroy
- Destroy command will be used to destroy the created configuration.
- You can use target flag to specify which resource you want to delete.
$ terraform destroy – target < flagname>- You can also pass the -out flag to pass the output to a file.
$ terraform destroy –out <filename.tfplan>
Terraform Graph
- Terraform creates a dependency graph when we execute the plan command, you can view the dependency graph using the graph command.
$ terraform graph

- You can export the graph data using command, these graphs can be visualised using tools graphviz.
$ terraform graph > <filename>.dot

- The graph will be displayed in below format,

- You can also run dot command; dot command is part of the tool. The output will be saved in svg format.

Terraform Variable
- Variable helps in centralize and manage values in the configuration.
- The variable block consist of
- Type
- Description
- Default values.
- We can create a file variable.tf or default file name terraform.tfvars. We can also specify flag for variable files.
- For any other file name used to define variable, use the command flag, –var-file. You can specify more than one file, but they will be executed in sequence.
- All environment variables are defined using prefix TF_VAR_<variable name>
- Terraform as a built in variable called as PATH it’s basically used in modules.
- We can have below variable types in Terraform
- String – Can be Boolean True or False or simple string
- Map – A collection type (Associate array or Hash Table, similar to dictonary of Python)
- List – A collection type (List of item, starting with index Zero).
- We can call variables four ways,Through command prompt
- Environment variables
- Default variables
- Variable defined in files
- Variables have name and optional parameters,
- Type – if type is omitted then terraform consider it as by default string.
- Default
- Description

- Variables definition,

- To call the variable in terraform main file. We need to use the keyword var as prefix
- Syntax : var.<variable_name>
- Calling the variables in main terraform file,
AWS Terraform Authentication
- To run terraform on your local system for your AWS, you will need to first configure AWS on your local system.
- Create a folder .aws/credential and store the AWS credential details at C:\Users\<yourhome folder>\.aws
- You can do the above also through AWS command line > aws configure

- You can define credentials in four different ways,
- Static
- Environment Variable
- Shared Credential file
- EC2 Role
- Static – it is basic method, we directly hard code the credentials in the .tf file provider section.

- Environment Variable – Run the below command for windows machine, for Linux system use export commands.

- Once configured the environmental variables, you can all the keys through provider sections.
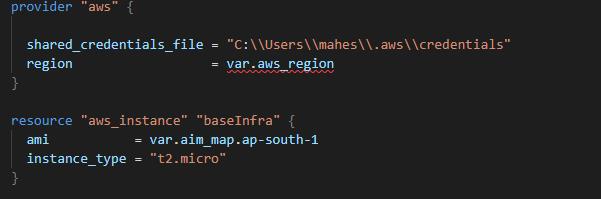
- Shared Credential files – You can access the credential files created using aws configure command. The file is by default at location $HOME/.aws/credentials. You can call the shared file like below in the provider section.

- EC2 Role – If running under EC2, then you can directly create and assign role to EC2, this avoids use of hard coded credentials.
- Assume role – We can provide role ARN, terraform will attempt this role. You can call the role ARN in provider section.

DynamoDB Accelerator (DAX)
DyanmoDB Accelerator (DAX)
- It is a fully managed, clustered in-memory cache for DynamoDB.
- It is only used for Read operation, can increase 10x Read operation performance.
- Microsecond performance for millions of request per second.
- Ideal for Read-heavy or Brusty workloads
How it works
- DAX is a write through cache service, i.e. it writes the data in cache as well as the backend DynamoDB table.
- Your application and point to the DAX cluster instead of the actual backend table.
- If the data you are looking in cache, the data is returned back from the cache and not from the actual table.
- If the item is not in the cache, the DAX will perform eventually consistent GetItem operation against the DynamoDB.
- Retrieval of the data from the DAX reduces the read load from actual DynamoDB table.
- It also helps in reducing the Provisioned read capacity.
Not Suitable for
- It is suitable for eventually consistent read operation, so it will not work with the application using Strongly Consistent.
- Write intensive application
- Application with fewer read operations
- Application that do not require microsecond read operations.